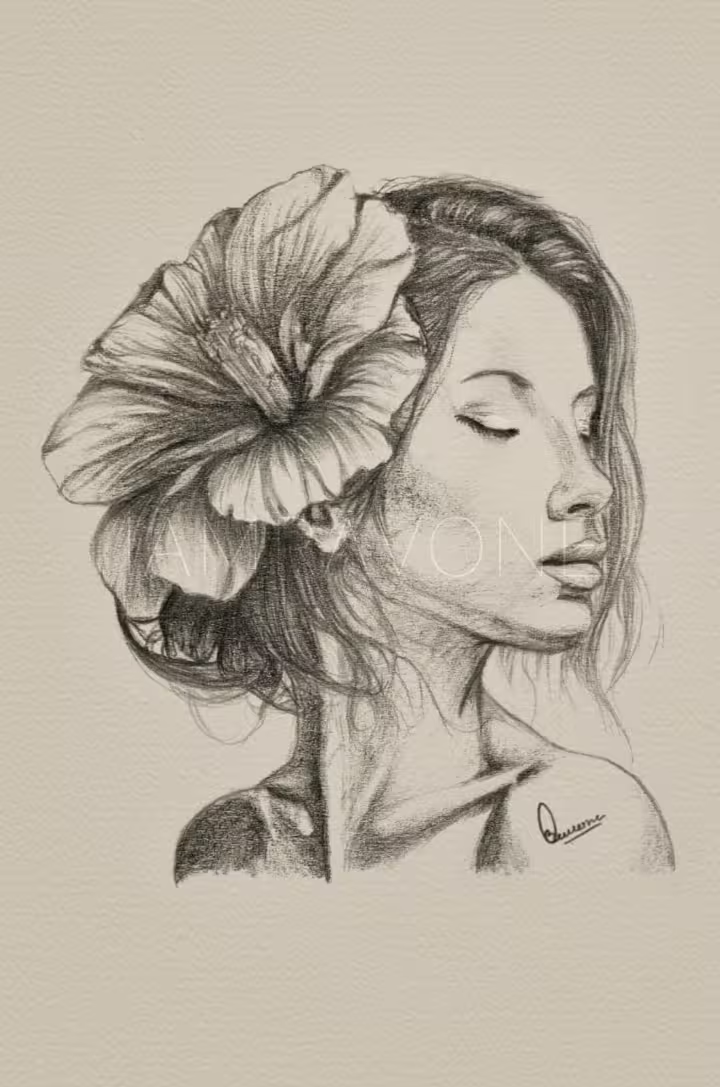
Harmonious Blossom
A Postcard Masterpiece

Hi, everyone. This post is all about the process of how Harmonious Blossom came to be, so let get started.
Creating “Harmonious Blossom” was a delightful journey that combined digital tools and traditional drawing techniques to bring a vision to life on a small 4x6 inch canvas. Here’s a detailed look at how I crafted this piece, from finding the perfect reference images to adding the final touches.
Finding the Perfect Reference
Every great piece of art starts with a solid reference. For “Harmonious Blossom,” I scoured the internet and my photo archives for images that could capture the essence of what I envisioned: a woman in a serene profile view with a large, intricate flower adorning her hair. After gathering several images, I turned to GIMP, my go-to image editing software, to combine and refine these elements into a cohesive reference.
Laying in the Proportions
With my reference ready, I started the drawing process using the planar method to lay in the proportions. This technique involves breaking down complex forms into simple geometric shapes and planes, which helps in maintaining accurate proportions and perspective. Using a 2H pencil, I lightly sketched the basic outlines of the woman and the large flower.
Once the basic structure was in place, I switched to an HB 2 mm mechanical pencil with a sharpened lead to refine the sketch. This precise tool allowed me to add intricate details and crisp lines, ensuring that the contours and features were meticulously rendered. I took my time to carefully map out the facial features, the delicate petals of the flower, and the flow of the hair.
Refining the Sketch
Once the basic structure was in place, I switched to an HB 0.3 mm mechanical pencil to refine the sketch. This fine-tipped pencil allowed me to add intricate details and crisp lines, ensuring that the contours and features were precisely rendered. I took my time to carefully map out the facial features, the delicate petals of the flower, and the flow of the hair.
Adding Shadows and Depth
To bring the drawing to life, I began laying in the base shadows using a 2B (2.0 mm) mechanical pencil. This step was crucial for separating light and shadow, giving the drawing its initial sense of depth and volume. I then gradually built up the shadows with 2B and 4B leads in a 0.5 mm mechanical pencil, which provided a richer, darker tone for the deepest areas of the drawing.
Using these varying pencil grades allowed me to create a dynamic range of values, enhancing the three-dimensionality of the portrait and the flower. I carefully blended the tones to achieve smooth transitions and emphasized the contrast between light and shadow to add realism and depth.
Final Touches
The final touches involved refining the details, enhancing textures, and making sure every part of the drawing was cohesive. I paid special attention to the intricate patterns of the flower petals and the soft gradients of the woman’s hair and skin. The result was “Harmonious Blossom,” a postcard-sized piece that exudes elegance and tranquility.
Creating this piece was an enjoyable and rewarding experience. It combined my love for both digital and traditional art techniques, and I’m thrilled with how it turned out.
Connect with Me
If you enjoyed reading about the creation process of “Harmonious Blossom,” follow me on Instagram and subscribe to my YouTube channel for more behind-the-scenes looks at my artwork and process videos. Thank you for joining me on this artistic journey!
- Instagram: @iamravone.art
- YouTube: Ravone Arts
STAY IN TOUCH
Keep up to date with new releases + early access to all offers, and subscribe to my monthly newsletter :)
Unsubscribe anytime. We respect your privacy.